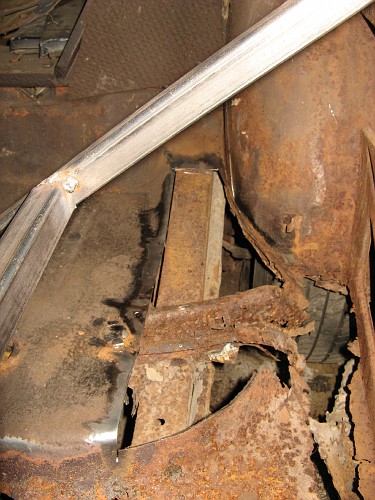
The rusty piece running from left to right in the picture is the rear body brace. And, as you can see, the outboard end is pretty well dissolved.
Fortunately, the one on the passenger side was in much better shape. I decided that my race across the floorboard better slow down a bit. At least long enough to do the body braces underneath the floor as I go.
So, a couple of weeks ago, I decided to get the rear body brace out of the passenger side to use as a template for making new ones. Replacements can be bought for $65.00 apiece, but there are three rows of them, and two sides to each row... That's about 400 bucks that I can spend better elsewhere. And making stuff is more fun than just buying it anyway, so we'll remove the one on the passenger side, and use it as a pattern to make new ones.
Well, it sounded easy, anyway.
First step was to drill out the old spot welds to get it loose from the part of the floor we didn't replace. Y'know- I've seen special tools for cutting spot welds before, and always laughed. I figured "What does that give me that a drill bit doesn't.?"
I know, now.
I spent the better part of a day just finding, and managing to drill out the old spot welds. Slow, frustrating work. Once I'd managed to get it free, the large holes from drilling made that spot weld cutter look a whole lot more valuable. The only semi-bright spot in that was that the metal I had to drill the huge holes in has some rust damage, and I'm going to need to replace it, too. So, I'll get away with it. And I ordered some spot weld cutters for the rest of the car, since I now understand the need for them. Oh, and I found one more nice little fact: Even when all of the attaching welds are cut, the body brace cannot be removed with the body on the frame!
But, as I've mentioned before-until the bottom of the body is strengthened back up, removing the body from the frame could be a colossal mistake. Gives me a nice little "Catch-22." I can't remove the body until I rebuild the bottom of the car, but I can't replace the braces with the body on the frame.
Okay, there's two solutions. One would be to remove the brace through the floorboard. But I just finished repairing the floor there! It would mean cutting out work that I've just finished! The other solution (the one we chose) is to cut the end off of the body brace so that it can be removed. Once it was out, I tack welded it back together for use as a pattern

It was really not in too bad of shape. It might have been repaired, but it was needed as a pattern.
There are two ways to make the replacements. They could be formed from a single piece, which would be delightfully challenging. It would also take forever, so I decided to make them out of three pieces.
They are diffrent from right to left sides, but are mirror images of one another, So I cut two leading sides, two trailing sides and two tops. When I put the bends in them, I bent them exactly opposite of it's counterpart from the other side. After a few tack welds with the MIG, I had this:

Starting to take shape, but a lot of work remains. I could just keep tacking with the MIG until they were solid, but MIG welds are harder than Oxy-Acetylene welds, and therefore harder to grind. I need more practice with doing the OA welds on sheetmetal before we start working on exterior metal, so- time to fire up the torch.

And nail these things together the old-fashioned way.

51Kid photography

After a bit of work with the torch, alternating back and forth between the two to avoid too much heat buildup, they looked like this. Complete, solid welds from end to end. The OA weld beads are not only softer than MIG beads, they also don't stick up as far, which means...

About ten minutes with a flapper wheel on a grinder, and they look like this!
Yes, that's a bit excessive on the metal finishing for something that is going to be hidden underneath the car, but it was also good practice for the work that will be visible on top. And this is the exact method I plan to use.
At this point, they're almost ready to go in. I still need to make and tack in the gussets where the body to frame ataching bolts will pass through. I also need to- yes- cut the ends off of them so that I can get them in. Once in, I'll weld them back together.
Once these are in, we'll be off to the races with the rear footwells and center body braces. I'll try to think ahead a bit better on the center braces, and maybe not have to put them in in two pieces!
Also, 51 Chick was busy in her role as "Seeker" this week, too. If you remember, the last thing I bought for the car in 2010 was an engine and transmission from a '55 Chevy. In February, she found me the '57 Chevy rearend that I wanted. The only other driveline pieces I was missing was a driveshaft and transmission slip yoke.
Well, she found a guy about 15 minutes from 51Kid's school who had a '57 Chevy driveshaft with slip yoke attached. The next morning, I dropped 51Kid off at school, and went to check on it. Sure enough, the slip yoke will fit the '55 transmission. The rear yoke will match up perfectly to the rearend, since they're out of the same make, model and year of car, and this driveshaft has been recently reconditioned!

I may need to have the shaft lengthened or shortened slightly. A 1951 Chevy and 1957 Chevy have almost the exact same wheelbase. Exactly where I put the motor mounts will determine for sure, but this thing may be perfect as it is. We'll see.