Sunday, June 26, 2011

Starting to get REAL fun!

  Alright, we're going to start tackling the very worst that the body of this car has to throw at us. 51Chick has been a bit disheartened by the extent of the rust in the bottom of the car. I can see where she's coming from. 51Kid thinks that her Daddy can fix anything, so I can't let her down.

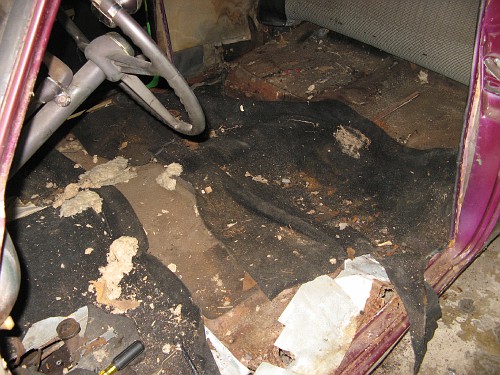
  When a car has rusted this bad underneath, you have to be ready for the possibility that things have moved, or that they may move when you start cutting out what is left. When the car has rusted this bad and lost a front wheel (running over it in the process)- even more likely. Working in our favor (about freaking time something does!) is the fact that this car is a sedan, not a hardtop. The fact that it has a "B" pillar helps strengthen the body.

  So, before we begin cutting, we need to brace everything up solidly. But, before that- we need to make sure that the cowl and B Pillar are correctly oriented to one another. There will never be a better time to correct this than right now.

  So, we start by taking a lot of measurements, and as luck has it, they look pretty good. Things look pretty square. However, if we consider the alignment of the doors NOW, it may make things a LOT easier down the road. The passenger door was aligned pretty close when I got the car, and it didn't take long to get it lined up perfectly. So, we used a bit of 1" square tube just to ensure things stay put.


  45 degree braces from the rear inner quatrter panel to the floor, and from the front door jamb to the trans tunnel. I tied them together with another piece of 1" tube.

  The driver's side is what worried me. The tire that came off hit the back of the fender near the cowl, and the fender was so weak that it didn't take much of the hit. After that hit, the car rolled over it, and the weak rocker got an upward bend to it, and actually broke loose at the front.  When I put the new door on it last Summer, I never was able to get it lined up very well. It always sat a bit too far to the rear, even with all of the adjustment taken out.

  That front fender that I can't use after all still has a purpose. I put it on temporarily to check the door to fender gap, and it showed an excessive gap.


  The primer on the door and the camera flash almost hide it, but the gap is almost 3/8"

    I got lucky again- I loosened the bolt holding the cowl to the frame under the door jamb at the front, and it sprang forward a slight bit. I still needed to slot the hinge mounting holes slightly (less than 1/8"), but after a couple of test fittings, the door was lining up like a champ!

  So, the next step is to brace up the driver's side the way we braced the passenger's side.


  Now, we're ready to start remaking the bottom of the car. But first- CAR SHOW BREAK!  My absolute favorite car show in Indy every year is the Road Rocket Rumble. It's a Friday-Saturday show, and I like going both days. Great cars and better people! It's a pretty deep resource for ideas and inspiration, and this year was no different.


  This '53 Lincoln was SWEET, And it had the lake pipes done the way I want to do mine. I'd never seen it done before, but in my mind, it looks awesome. This car proved that it looks as good in reality as it does in my head.


  Slick and sweet!


This picture was shot last month in Louisvile, but it was at the Rumble, too. This car is inspiring, to say the least. Many of the things he did are on the schedule for our car.  There is not a single unmodified body panel on this car.

  Back home after the second day of inspiration, it's time to start making some new floors.


  To start, these will be our most important tools


Besides these, but they're important tools in all of the jobs.

  The butcher paper is for making patterns. Once we trace out the pattern on the paper, we cut it out, and transfer it to the metal. If you try eyeballing this sort of thing, you're going to waste a LOT of sheetmetal!


  Getting ready to transfer from pattern to metal


Transferring (note: here's a really good sales idea for the people who make Sharpies- offer them with flavored caps.)


  Cutting. The Harbor Fright unishear surprised me with how well it cuts this thick stuff.


  And the first piece is cut! A couple whacks with the slapper to flatten it back out, a couple of bends, and it will be ready to install!

    I mentioned that the metal I'm using is thick. It's 16 gauge. We all know that older cars used thicker metal than today's cars do. In truth, the body of this car was all 18 gauge originally. On the bottom of the car, I'm going with the slightly thicker metal to add an extra level of strength. Over-engineering is one of my trademarks professionally, and I'm not going to stop doing it on my car. It's a bit harder to work with, but I want the car to outlive me, and this seems like better insurance to that end.

  It's almost time to start showing some serious automotive cancer surgery!

Saturday, June 11, 2011

Let's get ready to RUMBLE!

  Okay, bad '51 guy. 5 weeks since posting. I'd started with a bit of bodywork on the front fender, and sort of left it there.

  A lot has happened in the meantime.

  I'd been struggling with my oxy-acetylene welding of sheetmetal. Despite a lot of practice and experimentation, I could not get a weld I liked. It seemed that I either had colod welds with poor penetration, or I would just blow through. I knew I was close, but there was something I was doing wrong.

  I asked for advice on the HAMB, and got an invite from a member to come out to his shop for a little show and tell. I'm not going to brag about who it was who invited me into his shop... Oh hell- I WILL brag about it: It was Keith Burgan, a.k.a. Rooman. Very noted drag race chassis builder. Used to build the frames for John Force. Anyway- On Memorial Day, Roo got me on the right track within five minutes. It turns out that during my experimentation, the one flame I just knew was wrong was the exact flame I needed. We spent another hour and a half talking about fabrication, drag racing, and ideas for building cars.

  So, back at home, working on the fender- the welds are coming along MUCH nicer now. But- while working on the fender, I realized that the surface rust was worse than I thought, and had thinned the metal considerably.
Metal tearing after hammer and dolly work- too thin.

  So, I'm going to have to find another front fender for the driver's side.

  I decided to go ahead with working on the main body shell. I knew before I bought the car that it has serious floorboard issues, as well as plenty of rust in the rockers and body braces. All will need to be replaced, and my worst fear is that with the bottom of the car being so weak, the only strength left in the main shell is the roof. If that's the case, it could mean that the body might be swaybacked a bit, which would require some serious finesse to straighten before I can even begin rebuilding the bottom.

  Anyway, time to tear in. Out comes the grille and what's left of the front splash pan.


Next, I removed the driver's side fender. I wanted to see how badly the inner fender is damaged, and to see if the cowl was bent when it lost the front wheel that tore up the fender and door so badly.


\
Man, was this thing ever toasted!

  Examining the cowl, it does not appear bent. However, I have not been able to get the new door aligned since I got it. I'll need to address this before I go much further.

  Next was to remove the door for easier access to the inside.


  Next step is to remove the seats and carpeting. I started to get an idea of how truly bad the floorboard is when removing the seat. The seat is held in with 8 bolts. I removed 3, and was then able to "Hightower" the seat out due to the weak floor. If you don't know what "Hightowering" a seat is- go watch Police Academy.


  Starting to see a lot of rust, and roof flashing with pop rivets. Not good. Seriously- if your idea of rust repair involves pop rivets and roof flashing- consider taking up golf.


  With the carpet and padding removed, we see that it's pretty grim. Up front, we have a huge patch on the driver's side footwell, the passenger side footwell is very weak, and it's weak and patched along both sides.


  In back, more of the same- both footwells are very weak, and the sides of the rear seat platform are toasted.

    Okay, let's get the previous "repairs" out of the way.


  51 Chick getting in on the power tool action!

  It's THIS bad!


  Now, many of you would doubt at this point whether or not the car is worth saving. Good point. Even a lot of car guys would consider this a parts car at this point. And even I would say that if I were attempting to do a perfect 100 point concours restoration, I would start with a better car. Restoring just what you've seen here in the lower part of the shell would easily cost 2-3 thousand dollars (doing the work myself) if I were restoring it to exactly like original.

  But- a stock, completely original '51 Chevy doesn't do a whole lot for me :) What some see as a beautifully restored piece of history is "a nice starting point" to me. My floors, body braces and rockers do not have to look exactly like the ones Chevrolet put in the car. For my purpose- if they are strong, cleanly installed, and blend with the rest of the car- then they are perfect.  I'm not restoring. I'm building my idealized version of a '51 Chevrolet Styleline Special. Instead of 1700 (or more) in patch panels, I'll have a few hundred in raw sheetmetal that I will form to what I want it to be.

  This part will be scary, but this is the very worst the car has to offer. Once this is done, the rest will be straightforward. Once this is done, even the wimpiest of car guys would take on finishing it. It will take some crazy skills, but I have some skills, and I'm crazy- so I should be fine!