You do a big project the exact same way you eat an elephant- one bite at a time.
A year later, he's into doing heavy bodywork for himself. He's restoring an '88 S10 pickup that has been in our family since it was brand new. He bought it from my father, who bought it from me. He's cutting out rusty cab corners and rockers and welding in new ones. And he's getting good at it. He's hit snags and worked his way through them, and his truck is coming along nicely.
But, on Saturday, July the 9th- he didn't get SQUAT done on his truck. He came to the 51 Ranch for a day in the garage. Unlike the times before, we didn't spend the day leaning on the car and talking about making it better- we spent the day doing something about it!

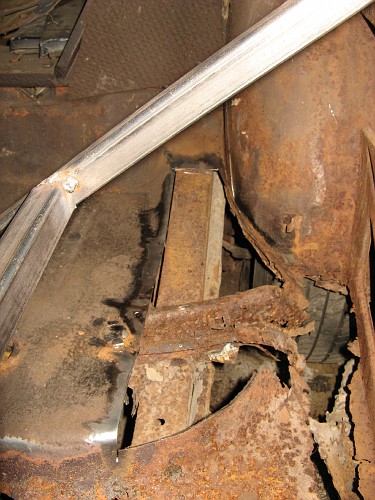
We cut out the rusted driveshaft tunnel

We then formed up a new tunnel. I put a little bit of extra height in the new tunnel. I'm going to lower the rear of the car, and when I do, that little bit of extra clearance may be huge. Then again, it may not be enough, but if not- We'll deal with that when the time comes.
The guy who stood in my garage and told me that he'd probably never learn to weld?

Here he is, in the same garage, welding in the new driveshaft tunnel. He's got plenty of ability and potential, and he's starting to believe in himself. I'm beyond tickled that I got to play a part in lighting that fire.
I found something interesting while we were working. During a BS break, I picked at a piece of cracking bondo on the quarter panel to flick at him. (It's a "guys in the shop" thing. If I have to explain, you wouldn't understand).
Well, I actually pulled off a fairly large chunk, and was amazed at what I found
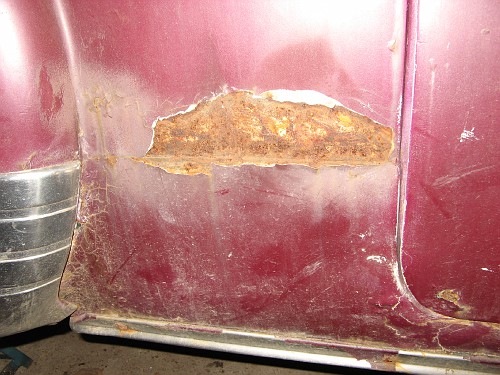
A bit hard to see in the picture, but when the "bodywork" was done before, they actually used patch panels! Of course, while the previous "bodyman" had the parts and tools to actually do a good job, he still failed miserably: instead of cutting out the bad metal and flush fitting the patch, he just slapped it over the bad metal, tacked it in place, and bondoed the heck out of it to (sort of) blend it in. Personally, I think this makes him even worse in my eyes- he had everything he needed to actually do a proper repair, and still failed. I hope he never touches another old car again.
Speaking of patch panels, looky what I got from Chevs of the 40's:

The following weekend, we took off to celebrate 51 Kid's birthday with a weekend in the woods. Camping, fishing, and swimming in a rock quarry. While we were up there, we stopped to check out a wooded area where there are dozens of old cars hiding in the woods. We've known about it for years, but now that we're old car owners, this sort of place has more interest for us. We didn't trespass, only looked from the road. 51 Chick is going to try and find out how to get in touch with the owner of the property- I could see a couple of '51 Chevys in the woods, and they could potentially provide us with a part or two. I'll keep you posted.
Back home to following weekend, it was time to start on the rear seat riser for the passengers side.

The body brace is in better shape on this side. I'll still have to remake it, but this one will at least serve well as a pattern for making the new ones.

Everything tacked into place

Most of the finish welding done.
Once we complete the finish welding and grinding on the passenger side seat riser, we're going to be ready to rebuild the rear body braces and put in rear footwells. I'll also be incorprating some solid mounting points for seat belts. I know that seat belts aren't exactly traditional, but they're not a negotiable point for me. The car will have them- tradition and opinions be damned.
I also added a new tool to the stable since I last updated this blog. When I started this project, I planned to do all of the work myself, excepting machine shop work, glass cutting and upholstery. Well...

Now, please be aware that my entire experience with sewing machines begins and ends with making a guide for one of the machines used in the alterations department at work. But, this is a commercial quality machine. It's strong enough to do leather or naugahyde. It's a good machine for doing upholstery work. Carl found me a killer deal on it. Of course, I have almost no idea as to how to use it, but look at the pictures above- those are pictures of where the back seat goes. I have time to learn!
Looks like Justin isn't the only one adding new skills to the arsenal.