Sunday, July 31, 2011

One piece at a time

  And it didn't cost me a dime. Well, I can wish that part were true.  Last year, soon after I'd gotten the car, the coolest nephew in the world was over, checking out the new toy. He mentioned that it seemed an intimidating project. Yeah, yeah- I KNOW he's right, but if a person allows himself to dwell on how intimidating a project is, they will end up talking themselves out of doing it at all. All I said in response to his (Accurate) observation was:

  You do a big project the exact same way you eat an elephant- one bite at a time.

  A year later, he's into doing heavy bodywork for himself. He's restoring an '88 S10 pickup that has been in our family since it was brand new. He bought it from my father, who bought it from me. He's cutting out rusty cab corners and rockers and welding in new ones. And he's getting good at it. He's hit snags and worked his way through them, and his truck is coming along nicely.

  But, on Saturday, July the 9th- he didn't get SQUAT done on his truck. He came to the 51 Ranch for a day in the garage. Unlike the times before, we didn't spend the day leaning on the car and talking about making it better- we spent the day doing something about it!

We cut out the rusted driveshaft tunnel


  We then formed up a new tunnel. I put a little bit of extra height in the new tunnel. I'm going to lower the rear of the car, and when I do, that little bit of extra clearance may be huge. Then again, it may not be enough, but if not- We'll deal with that when the time comes.

   The guy who stood in my garage and told me that he'd probably never learn to weld?

  Here he is, in the same garage, welding in the new driveshaft tunnel. He's got plenty of ability and potential, and he's starting to believe in himself. I'm beyond tickled that I got to play a part in lighting that fire.

  I found something interesting while we were working. During a BS break, I picked at a piece of cracking bondo on the quarter panel to flick at him. (It's a "guys in the shop" thing. If I have to explain, you wouldn't understand).

  Well, I actually pulled off a fairly large chunk, and was amazed at what I found
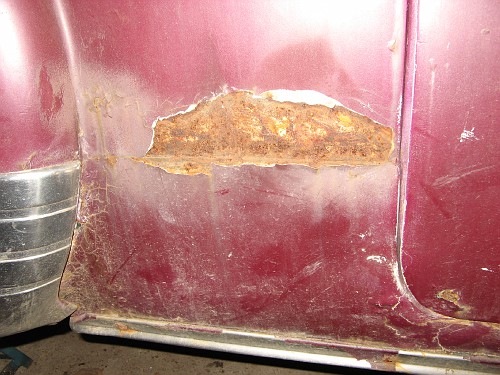
  A bit hard to see in the picture, but when the "bodywork" was done before, they actually used patch panels! Of course, while the previous "bodyman" had the parts and tools to actually do a good job, he still failed miserably: instead of cutting out the bad metal and flush fitting the patch, he just slapped it over the bad metal, tacked it in place, and bondoed the heck out of it to (sort of) blend it in. Personally, I think this makes him even worse in my eyes- he had everything he needed to actually do a proper repair, and still failed. I hope he never touches another old car again.

  Speaking of patch panels, looky what I got from Chevs of the 40's:

    The following weekend, we took off to celebrate 51 Kid's birthday with a weekend in the woods. Camping, fishing, and swimming in a rock quarry. While we were up there, we stopped to check out a wooded area where there are dozens of old cars hiding in the woods. We've known about it for years, but now that we're old car owners, this sort of place has more interest for us. We didn't trespass, only looked from the road. 51 Chick is going to try and find out how to get in touch with the owner of the property- I could see a couple of '51 Chevys in the woods, and they could potentially provide us with a part or two. I'll keep you posted.

  Back home to following weekend, it was time to start on the rear seat riser for the passengers side.

  The body brace is in better shape on this side. I'll still have to remake it, but this one will at least serve well as a pattern for making the new ones.

  Everything tacked into place

  Most of the finish welding done.

  Once we complete the finish welding and grinding on the passenger side seat riser, we're going to be ready to rebuild the rear body braces and put in rear footwells. I'll also be incorprating some solid mounting points for seat belts. I know that seat belts aren't exactly traditional, but they're not a negotiable point for me. The car will have them- tradition and opinions be damned.

  I also added a new tool to the stable since I last updated this blog. When I started this project, I planned to do all of the work myself, excepting machine shop work, glass cutting and upholstery. Well...
  Now, please be aware that my entire experience with sewing machines begins and ends with making a guide for one of the machines used in the alterations department at work. But, this is a commercial quality machine. It's strong enough to do leather or naugahyde. It's a good machine for doing upholstery work. Carl found me a killer deal on it. Of course, I have almost no idea as to how to use it, but look at the pictures above- those are pictures of where the back seat goes. I have time to learn!

  Looks like Justin isn't the only one adding new skills to the arsenal.


Friday, July 8, 2011

AFU!

  How am I feeling on the project lately? Actually, Sammy Hagar outloined my current feelings pretty well:
90 days on the road is what I need
When my axe cuts me deep, I let it bleed
On the stage, off my strings, down my face
And all over me
Pumpin' up for the show
Feelin' like something's gonna blow
S'got me all fired up
Yes, I'm all fired up
Through the ice into the fire
Blowin' steam
North and south, east n'west, right n'left
I'm always extreme
Don't like the middle squeezing me
I don't like nothin' in between
Yes, I'm all fired up
Got me all fired up
When the rest have packed it up
I'm alive, I'm electric, inspired
I, I'm naturally wired
Wired, naturally wired
Wired, wired
I'm naturally wired
Naturally wired
Wired, naturally wired
Wired, naturally wired.

  Why am I fired up and feeling invincible? I AM FIXING RUST, that's why! As a car guy, I hate rust. We ALL hate it- we're conditioned to hate it. But, I've come to realize something about myself in the past couple of weeks: I LOVE fixing rust. Absolutely love it. It's a huge rush to see myself fixing something that most people would give up on. It's a bigger rush to enjoy it so much!
  Blah, blah- enough touchy-feely stuff, let's show what we've done, what we've found, and where we're going next.
This area was of special interest to me. The day after I brought it home, I pulled the rear seat bottom out and noticed that in this corner, I could see daylight through the car. That bothered me, so I saw fit to attack this area first. What you're looking at is the rear seat riser and driver's side rear wheelwell from the inside of the car. Notice that through the hole, you can see the rear tire. I almost got ahead of my photography- you can see the cut mark made with my ever-present Sharpie.


Bad metal on top of the riser cut away. The rusty piece running from side to side is the body brace, and will be replaced. The part running up and down is the frame, and it has only surface rust, which is easily dealt with. I expected to find the top of the frame to need some serious repair, but I'm finding nothing worse than minor surface rust on it.


The first piece of new metal tacked in place. I'm starting to feel good.


And, a couple hours later, the whole corner and seat riser is rebuilt. Still needs finish welding and grinding, but I'm starting to feel REAL good! The car now has less rust and more solid metal than it's had over the past 3 owners!

  Of course, there's always more rust to be found in a car this bad. I expected that.


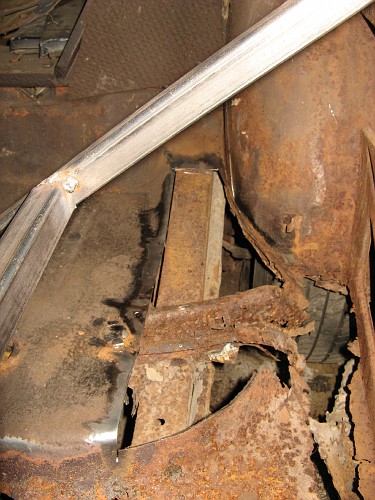
No, I'm not pointing to something with an abbreviated digit. I still have all my fingers in their stock length. What you can't see is sticking through a rust hole. Gonna have to make a new trans tunnel.

  I also decided to take the door threshold plate and trim off the rocker. Once I'd done that, I was able to remove the inner and outer rocker with my bare hands! Yes, the rust was bad, but a little detective work showed that there was more than just rust at work: When it recieved the botched "bodywork" by the jackweed previous owner, they had actually installed a replacement rocker panel- with screws into rusty metal underneath.

With the inner and outer rocker off, it makes for a somewhat graphic and frightening picture


Yee-haw! This is gonna be fun. Seriously- I'm gonna have a blast with this!

  Next steps are to replace the trans tunnel, and duplicate the rear seat riser repair on the passenger side. After that, we'll rebuild the body brace under the seat riser and then replace the rear footwells. Tomorrow is going to be a blast- Coolest nephew in the world is coming over to help work on it. A year ago, he stood in my garage and told me he'd probably never learn to weld. A month later, he owned his own welder and was doing heavy work on his pickup truck. Tomorrow, he becomes guest welder #1 on the Chevy!
 

Sunday, June 26, 2011

Starting to get REAL fun!

  Alright, we're going to start tackling the very worst that the body of this car has to throw at us. 51Chick has been a bit disheartened by the extent of the rust in the bottom of the car. I can see where she's coming from. 51Kid thinks that her Daddy can fix anything, so I can't let her down.

  When a car has rusted this bad underneath, you have to be ready for the possibility that things have moved, or that they may move when you start cutting out what is left. When the car has rusted this bad and lost a front wheel (running over it in the process)- even more likely. Working in our favor (about freaking time something does!) is the fact that this car is a sedan, not a hardtop. The fact that it has a "B" pillar helps strengthen the body.

  So, before we begin cutting, we need to brace everything up solidly. But, before that- we need to make sure that the cowl and B Pillar are correctly oriented to one another. There will never be a better time to correct this than right now.

  So, we start by taking a lot of measurements, and as luck has it, they look pretty good. Things look pretty square. However, if we consider the alignment of the doors NOW, it may make things a LOT easier down the road. The passenger door was aligned pretty close when I got the car, and it didn't take long to get it lined up perfectly. So, we used a bit of 1" square tube just to ensure things stay put.


  45 degree braces from the rear inner quatrter panel to the floor, and from the front door jamb to the trans tunnel. I tied them together with another piece of 1" tube.

  The driver's side is what worried me. The tire that came off hit the back of the fender near the cowl, and the fender was so weak that it didn't take much of the hit. After that hit, the car rolled over it, and the weak rocker got an upward bend to it, and actually broke loose at the front.  When I put the new door on it last Summer, I never was able to get it lined up very well. It always sat a bit too far to the rear, even with all of the adjustment taken out.

  That front fender that I can't use after all still has a purpose. I put it on temporarily to check the door to fender gap, and it showed an excessive gap.


  The primer on the door and the camera flash almost hide it, but the gap is almost 3/8"

    I got lucky again- I loosened the bolt holding the cowl to the frame under the door jamb at the front, and it sprang forward a slight bit. I still needed to slot the hinge mounting holes slightly (less than 1/8"), but after a couple of test fittings, the door was lining up like a champ!

  So, the next step is to brace up the driver's side the way we braced the passenger's side.


  Now, we're ready to start remaking the bottom of the car. But first- CAR SHOW BREAK!  My absolute favorite car show in Indy every year is the Road Rocket Rumble. It's a Friday-Saturday show, and I like going both days. Great cars and better people! It's a pretty deep resource for ideas and inspiration, and this year was no different.


  This '53 Lincoln was SWEET, And it had the lake pipes done the way I want to do mine. I'd never seen it done before, but in my mind, it looks awesome. This car proved that it looks as good in reality as it does in my head.


  Slick and sweet!


This picture was shot last month in Louisvile, but it was at the Rumble, too. This car is inspiring, to say the least. Many of the things he did are on the schedule for our car.  There is not a single unmodified body panel on this car.

  Back home after the second day of inspiration, it's time to start making some new floors.


  To start, these will be our most important tools


Besides these, but they're important tools in all of the jobs.

  The butcher paper is for making patterns. Once we trace out the pattern on the paper, we cut it out, and transfer it to the metal. If you try eyeballing this sort of thing, you're going to waste a LOT of sheetmetal!


  Getting ready to transfer from pattern to metal


Transferring (note: here's a really good sales idea for the people who make Sharpies- offer them with flavored caps.)


  Cutting. The Harbor Fright unishear surprised me with how well it cuts this thick stuff.


  And the first piece is cut! A couple whacks with the slapper to flatten it back out, a couple of bends, and it will be ready to install!

    I mentioned that the metal I'm using is thick. It's 16 gauge. We all know that older cars used thicker metal than today's cars do. In truth, the body of this car was all 18 gauge originally. On the bottom of the car, I'm going with the slightly thicker metal to add an extra level of strength. Over-engineering is one of my trademarks professionally, and I'm not going to stop doing it on my car. It's a bit harder to work with, but I want the car to outlive me, and this seems like better insurance to that end.

  It's almost time to start showing some serious automotive cancer surgery!

Saturday, June 11, 2011

Let's get ready to RUMBLE!

  Okay, bad '51 guy. 5 weeks since posting. I'd started with a bit of bodywork on the front fender, and sort of left it there.

  A lot has happened in the meantime.

  I'd been struggling with my oxy-acetylene welding of sheetmetal. Despite a lot of practice and experimentation, I could not get a weld I liked. It seemed that I either had colod welds with poor penetration, or I would just blow through. I knew I was close, but there was something I was doing wrong.

  I asked for advice on the HAMB, and got an invite from a member to come out to his shop for a little show and tell. I'm not going to brag about who it was who invited me into his shop... Oh hell- I WILL brag about it: It was Keith Burgan, a.k.a. Rooman. Very noted drag race chassis builder. Used to build the frames for John Force. Anyway- On Memorial Day, Roo got me on the right track within five minutes. It turns out that during my experimentation, the one flame I just knew was wrong was the exact flame I needed. We spent another hour and a half talking about fabrication, drag racing, and ideas for building cars.

  So, back at home, working on the fender- the welds are coming along MUCH nicer now. But- while working on the fender, I realized that the surface rust was worse than I thought, and had thinned the metal considerably.
Metal tearing after hammer and dolly work- too thin.

  So, I'm going to have to find another front fender for the driver's side.

  I decided to go ahead with working on the main body shell. I knew before I bought the car that it has serious floorboard issues, as well as plenty of rust in the rockers and body braces. All will need to be replaced, and my worst fear is that with the bottom of the car being so weak, the only strength left in the main shell is the roof. If that's the case, it could mean that the body might be swaybacked a bit, which would require some serious finesse to straighten before I can even begin rebuilding the bottom.

  Anyway, time to tear in. Out comes the grille and what's left of the front splash pan.


Next, I removed the driver's side fender. I wanted to see how badly the inner fender is damaged, and to see if the cowl was bent when it lost the front wheel that tore up the fender and door so badly.


\
Man, was this thing ever toasted!

  Examining the cowl, it does not appear bent. However, I have not been able to get the new door aligned since I got it. I'll need to address this before I go much further.

  Next was to remove the door for easier access to the inside.


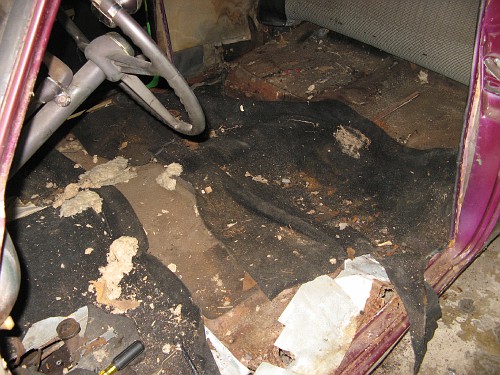
  Next step is to remove the seats and carpeting. I started to get an idea of how truly bad the floorboard is when removing the seat. The seat is held in with 8 bolts. I removed 3, and was then able to "Hightower" the seat out due to the weak floor. If you don't know what "Hightowering" a seat is- go watch Police Academy.


  Starting to see a lot of rust, and roof flashing with pop rivets. Not good. Seriously- if your idea of rust repair involves pop rivets and roof flashing- consider taking up golf.


  With the carpet and padding removed, we see that it's pretty grim. Up front, we have a huge patch on the driver's side footwell, the passenger side footwell is very weak, and it's weak and patched along both sides.


  In back, more of the same- both footwells are very weak, and the sides of the rear seat platform are toasted.

    Okay, let's get the previous "repairs" out of the way.


  51 Chick getting in on the power tool action!

  It's THIS bad!


  Now, many of you would doubt at this point whether or not the car is worth saving. Good point. Even a lot of car guys would consider this a parts car at this point. And even I would say that if I were attempting to do a perfect 100 point concours restoration, I would start with a better car. Restoring just what you've seen here in the lower part of the shell would easily cost 2-3 thousand dollars (doing the work myself) if I were restoring it to exactly like original.

  But- a stock, completely original '51 Chevy doesn't do a whole lot for me :) What some see as a beautifully restored piece of history is "a nice starting point" to me. My floors, body braces and rockers do not have to look exactly like the ones Chevrolet put in the car. For my purpose- if they are strong, cleanly installed, and blend with the rest of the car- then they are perfect.  I'm not restoring. I'm building my idealized version of a '51 Chevrolet Styleline Special. Instead of 1700 (or more) in patch panels, I'll have a few hundred in raw sheetmetal that I will form to what I want it to be.

  This part will be scary, but this is the very worst the car has to offer. Once this is done, the rest will be straightforward. Once this is done, even the wimpiest of car guys would take on finishing it. It will take some crazy skills, but I have some skills, and I'm crazy- so I should be fine!


Saturday, April 30, 2011

Shop improvement and blog cross-pollenation

  Okay, if you're only interested in seeing actual progress on the Chevy, you'll probably want to go ahead and skip this entry, because this week hasn't seen any.

  However, there's a new tool in the shop at the 51 ranch that will play a MAJOR part in upcoming repairs.

  One day, while working on a project with Carl, my tool sensei, I mentioned that 51chick's mom had given me a nice sized Sears gift card for Christmas with the instruction to use it for tools for the car.

  My mother-in-law has a very good appreciation for old cars. To top it off, her first car was not only a 51 Chevrolet, but it was the same color that mine was originally. So, needless to say, she's quite interested in seeing my project move along. I used the gift card to buy an excellent Chicago Pneumatic straight line sander.

  When I told Carl about it, I mentioned that I would have to get a bigger compressor, since I neither of my small compressors would run any decent sized air tool. He instantly scolded me for the idea of buying one. He suggested that we build one. We went to his pole barn, and started digging. Within 20 minutes, we'd selected a 30 gallon tank from a dead compressor, and a two cylinder compressor unit from another dead one. The next project was ON. A bit of fabricating, a few more parts from here and there, a few bells and whistles added, and "Frankenpressor" was alive!

She'll build the tank from empty to 125 psi within 2 minutes. She'll run any shop tool I have, and she's got enough oomph to paint a car. And my total investment in it is a hair over 80 bucks. I love it!!!!

Cross Pollenation

  I've mentioned MANY times in this blog about getting generous help from others. Here at the 51 ranch, we firmly believe in "kinetic Karma." The notion of helping others whenever the opportunity arises, and graciously accepting help when others want to give it. The only thing I like better than recieving blessings is to be used as a tool to deliver blessings to others.

  Enter a gentleman who has been a friend for 35 years. I refuse to call him an "old friend," since we were born on the same day, and the "old" part stings a bit :)

  His automotive passion is fuel mileage. Exploring any and all methods to increase fuel economy. He'll test any theory or gizmo alleged to improve fuel mileage with a very critical eye. He has proven some to be quite beneficial, and he has debunked several others.

  And he doesn't do it with a tiny, commuter 4 cylinder vehicle. He does it with a MAN'S vehicle: a '04 Toyota Tundra with V8, Automatic transmission, 4 wheel drive, double cab, and plenty of bells and whistles. This is an impressive truck- if you stuck an emission sniffer in the tailpipe, I wouldn't be surprised to find the exhaust was pure testosterone!

  If you doubt that his extensive work on reducing fuel consumption is appropriate for such a vehicle, I'll just say this: When he acquired the vehicle, it got 14 mpg on the highway. It served him in his business, and as his personal vehicle. It now has 200,000 miles and gets 21 mpg on the highway. For those of you playing at home, that's a 50% improvement! He runs a great blog about his work with improving fuel economy in the truck, and I can say from experience that I have applied some of his techniques, and have seen improvement in my own mileage. If you have any interest in getting more miles from that 4 dollar gallon of gas, I highly recommend checking it out: http://tundra-mpg.blogspot.com/

  Recently, he noticed the telltale signs of a failing wheel bearing. Like me, life and the economy have worked against him recently, and paying someone to replace it wasn't a comfortable option.

  So, he brought the truck to the 51 ranch, and we made a day of getting the bearing replaced.

Note the beautiful dark green color. I'm wanting to return the 51 to a nice dark green base color. This one just might contend.

  After removing the knuckle, the wheel bearing threw us a challenge or two, and we eventually did realize that discretion was the better part of valor and used a machine shop to do the actual pressing of the bearing, since my press isn't quite large enough to handle this job. This truck is built very beefy!


If you're noticing that you cannot see a jack stand in this picture, fear not. They might not show, but we actually had TWO stands under the truck at the raised corner. Note the 4 piston brake caliper- more beef!

  In the end, it all went back together with more ease than it came apart. I very much enjoyed the company, the work itself, and the opportunity to help!


Job complete- all smiles!

  I promise to be back to doing more with less on the old girl next week!

Sunday, April 24, 2011

Bodywork, traditional style.

  It's been a rough couple of months here at the 51 ranch. In March, we had issues from the collapsed main drain line ($1850 to repair), then in April, without changing our income or deductions, we went from getting a couple hundred back during the Bush presidency to owing over $3000 in the wonderful world of "Hope and Change." But hey- at least Chevron and GE didn't have to pay anything at all, so I can feel good about paying what the billionaires didn't have to.

  At any rate, these events have had a negative impact on the project. The plan was (and still is) to have the car on the road for a while this year. Run it ugly, have some fun with the family in it, then blow it up and start in on the bodywork this fall

  Unfortunately, one thing between here and roadworthy is tires, and those won't come cheaply. And the rewire will be a case of getting "nickle and dimed to death." Honestly, I want to push forward with the original plan, but I'm also formulating a backup plan to keep progressing even if it doesn't hit the road this year.

  The plan is BODYWORK. I'm going to save the really nasty rust work until last (floors, rockers, and rear quarters), but I can work on things like doors and fenders before that. That's the plan for now, and we'll just have to see if I'm able to get it on the road this year. Anyway- on to some metalwork!

  You may remember the 1950 Chevy front fender I scored the week after I got the car.


  Not too bad, in actuality. Plenty of surface rust, a few dents, and holes for trim that I will not be reusing. In addition, there was one area of rust through, just behind the front wheel arch. The first step was to strip off the old paint and brush away the rust. I followed it with a coat of Eastwood's version of POR-15 (paint over rust) paint on the inside, and a thin coat of rust converter on the outside.


In this picture, I've already cut a patch section for the rusted out area, and marked where I'll cut the old metal out.

  Now, in addition to doing this car in a traditional style, in many areas, I'll also be using traditional techniques. For the body repairs, I won't be using a MIG or TIG welder, I'll be using an oxy-acetylene torch with a size 00 tip, and hammer welding. I started by welding up and hammering the trim holes along the side.


After welding and hammering, before grinding.

  I'll be going with a frenched antenna (or two) on the rear fender, so the antenna hole has to go.


Coating stripped away


Patch section clamped in place for tacking


After welding and hammering


After grinding. No filler needed, here- just some high-build primer and block sanding.

  I got the rusted area cut out and was ready to start welding in the patch when 51Chick informed me that Easter dinner was ready, so you'l have to catch the end of this part of the fender at a later date